By Gauthier Sebille & Cyril B
Everything is in the title. In this new blog post about DAC, we are going to deploy our own one.
Pre-requisites
- The excellent article, published by Nomadic Labs, introducing Data Availability Committees.
This article is essential because it explains what a DAC is, its architecture, how it works, the role of the all the DAC actors (Coordinator, Members and Observers).
- Our previous blog post announcing Community DAC on Tezos Ghostnet.
In that blog post, we explain how to interact with DAC and how to do a “complete loop”:
- Push data,
- Retrieve certificate,
- Retrieve data.
We are going to configure and run:
- One DAC Coordinator,
- Two DAC Members,
- One DAC Observer.
What are we going to configure and run?
In this blog post, we are going to configure each actor of DAC:
- One DAC Coordinator
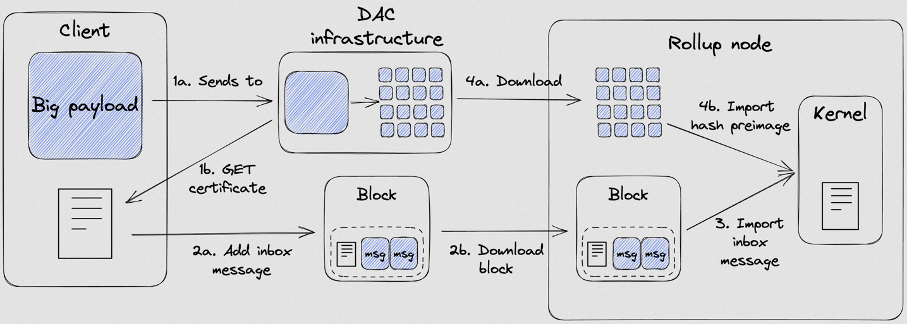
- It is responsible to receive payloads from client, propagate them to DAC Members and Observers. It also stores and provides the DAC certificates of payloads stored by Members.
- Two DAC Members
- They have a forever connection to the Coordinator and will get notified of new payloads from the Coordinator, after which they will download the data and send back a signature to the Coordinator to attest that they will make the data available upon request
- One DAC Observer
- Like the Members, Observer will also download payloads from Coordinator, but it will not sign it. It is also responsible for retrieving missing data from DAC Member. This actor is meant to be used to provide data requested by Smart Rollup node via the reveal data channel.
The schema below, from Nomadic Labs blog post, shows the previously explained interactions.
We will not dive into technical details about DAC implementation in this blog post.
Create data directories and setup environment variables
Set up the environment variables to ease usage of next commands to configure and run actors:
# Directory where the config and data will be stored for the Coordinator.
export COORDINATOR_DIR=${HOME}/.tezos-ghostnet/dac-coordinator
export COORDINATOR_REVEAL_DATA_DIR=${HOME}/.tezos-ghostnet/dac-coordinator/reveals
# Same as previous directory, but for one Member.
export DAC_MEMBER_0_DIR=${HOME}/.tezos-ghostnet/dac-member-0
export DAC_MEMBER_0_REVEAL_DATA_DIR=${HOME}/.tezos-ghostnet/dac-member-0/reveals
# Second Member.
export DAC_MEMBER_1_DIR=${HOME}/.tezos-ghostnet/dac-member-1
export DAC_MEMBER_1_REVEAL_DATA_DIR=${HOME}/.tezos-ghostnet/dac-member-1/reveals
# Finally, the Observer which is like an archiver in this tutorial.
export OBSERVER_DIR=${HOME}/.tezos-ghostnet/dac-observer
export OCTEZ_CLIENT_DIR=${HOME}/.tezos-ghostnet/client
# Reveal_data_dir is the shared folder between DAC Observer and your Smart Rollup.
export REVEAL_DATA_DIR=${HOME}/.tezos-ghostnet/soru/wasm_2_0_0
export GHOSTNET_RPC=https://ghostnet.tezos.marigold.dev
Set up the directories listed in the environment variable above:
mkdir ~/.tezos-ghostnet
mkdir $COORDINATOR_DIR
mkdir $COORDINATOR_REVEAL_DATA_DIR
mkdir $DAC_MEMBER_0_DIR
mkdir $DAC_MEMBER_0_REVEAL_DATA_DIR
mkdir $DAC_MEMBER_1_DIR
mkdir $DAC_MEMBER_1_REVEAL_DATA_DIR
mkdir $OBSERVER_DIR
mkdir $REVEAL_DATA_DIR
mkdir $OCTEZ_CLIENT_DIR
Configure the accounts
We will need two tz4 accounts that will be used as Commitee Members:
octez-client -d ${OCTEZ_CLIENT_DIR} -E ${GHOSTNET_RPC} bls gen keys member0
octez-client -d ${OCTEZ_CLIENT_DIR} -E ${GHOSTNET_RPC} bls gen keys member1
If you want to use already existing keys, you can import them:
octez-client -d ${OCTEZ_CLIENT_DIR} -E ${GHOSTNET_RPC} bls import secret key member0 aggregate_unencrypted:BLpk1vs61UGcpfoSMtqFAx3JUVLQRi72Ra7cqkdhR68fd9ZM4UV6dqVF2Ew8LMEPCR2ncey5UXS5
octez-client -d ${OCTEZ_CLIENT_DIR} -E ${GHOSTNET_RPC} bls import secret key member1 aggregate_unencrypted:BLpk1vs61UGcpfoSMtqFAx3JUVLQRi72Ra7cqkdhR68fd9ZM4UV6dqVF2Ew8LMEPCR2ncey5UXS5
We can check that the accounts have been created via the following commands. Note that commands for retrieving information of tz4 accounts have an additional bls prefix after the global parameters.
octez-client -d ${OCTEZ_CLIENT_DIR} -E ${GHOSTNET_RPC} bls show address member0

Warning:


                 This is NOT the Tezos Mainnet.

           Do NOT use your fundraiser keys on this network.

Hash: tz4SttKjMnG63m2XcguPC3zjmPEQpVfHzsn1
Public Key: BLpk1vs61UGcpfoSMtqFAx3JUVLQRi72Ra7cqkdhR68fd9ZM4UV6dqVF2Ew8LMEPCR2ncey5UXS5
octez-client -d ${OCTEZ_CLIENT_DIR} -E ${GHOSTNET_RPC} bls show address member1

Warning:

                 This is NOT the Tezos Mainnet.

           Do NOT use your fundraiser keys on this network.

Hash: tz4HQKiMhopVXhrWyRMDKoMV5E5trggHW8s2
Public Key: BLpk1qrzm2vb1JaRd5tm5NtSuaHK3nJziMiqE56qC2Tug9GNDmnSeh5pXQRaPvrSNk94uPoz3Uy4
Save both the public key and the public key hash of the members, we will need them later
export MEMBER0_PKH=tz4SttKjMnG63m2XcguPC3zjmPEQpVfHzsn1
export MEMBER0_PK=BLpk1vs61UGcpfoSMtqFAx3JUVLQRi72Ra7cqkdhR68fd9ZM4UV6dqVF2Ew8LMEPCR2ncey5UXS5

export MEMBER1_PKH=tz4HQKiMhopVXhrWyRMDKoMV5E5trggHW8s2
export MEMBER1_PK=BLpk1qrzm2vb1JaRd5tm5NtSuaHK3nJziMiqE56qC2Tug9GNDmnSeh5pXQRaPvrSNk94uPoz3Uy4
Configure and run the DAC infrastructure
Penultimate step which is quite straightforward, we are going to configure each actor with octez-dac-node configure command.
If you want to learn more about DAC, please read our blog post on Marigold website ![]() How to deploy your own Data Availability Committee?
How to deploy your own Data Availability Committee?


