Nomadic Labs is excited to introduce a new open-source hardware signing solution, tailored to Tezos bakers: the Raspberry Pi BLS Signer.
Context: Aggregated attestations and BLS signatures
Under previous Tezos protocols, each attesting baker would submit one attestation per block. These are essential for chain consensus, but because each attestation is included individually, they impact block size significantly.
With the Seoul protocol upgrade, attestations can be aggregated into a single operation per block for bakers using tz4 / BLS keys. This reduces the number of attestations recorded on-chain, improving network efficiency and enabling lower latency with faster block times.
While tz4 / BLS keys are still optional for baking, it represents the direction in which Tezos consensus is expected to evolve.
Why a new solution is needed
Many bakers have traditionally relied on Ledger hardware signers for secure key management. However, the currently available models are unable to sign the more computationally demanding BLS signatures fast enough for Tezos consensus needs.
This creates a gap: bakers still need a secure, accessible, and affordable way to handle BLS signing and start using tz4 keys and aggregating attestations.
An open-source hardware signer for bakers
To address this, Nomadic Labs is introducing an open-source, low-cost hardware solution.
The Tezos RPI BLS Signer is a self-contained hardware signer that runs on a dedicated Raspberry Pi device. It is designed for safety, and the hardware performance is plenty for processing BLS signatures (tz4) fast enough for Tezos consensus, now and in the future.
-
Dedicated hardware: Runs separately from your Tezos node
-
Consensus-only signing: Handles only block and attestation operations by default
-
Security-focused: Simple Bash + Python stack, minimal dependencies, optional secure-element support
-
Visual feedback: E-ink touchscreen for password input and key status
-
Open source: Transparent, community-driven project
Testing and ecosystem involvement
The Tezos RPI BLS Signer is currently a beta prototype, and we encourage bakers and other interested parties to explore the open repository and contribute to further testing and development.
Several ecosystem members have already provided highly valuable early feedback, merge requests, and detailed issue reports. We warmly thank them for their time, involvement, and constructive input. Their contributions have already led to meaningful improvements in usability, robustness, and documentation.
Still, further improvement is needed before the RPI BLS Signer is production-ready. For that, we need broad community involvement, with more user feedback (from test networks), fresh ideas, and direct contributions to the code.
To make collaboration easier, we’ve opened a dedicated Discord channel where contributors can exchange feedback, report issues, and follow development updates.
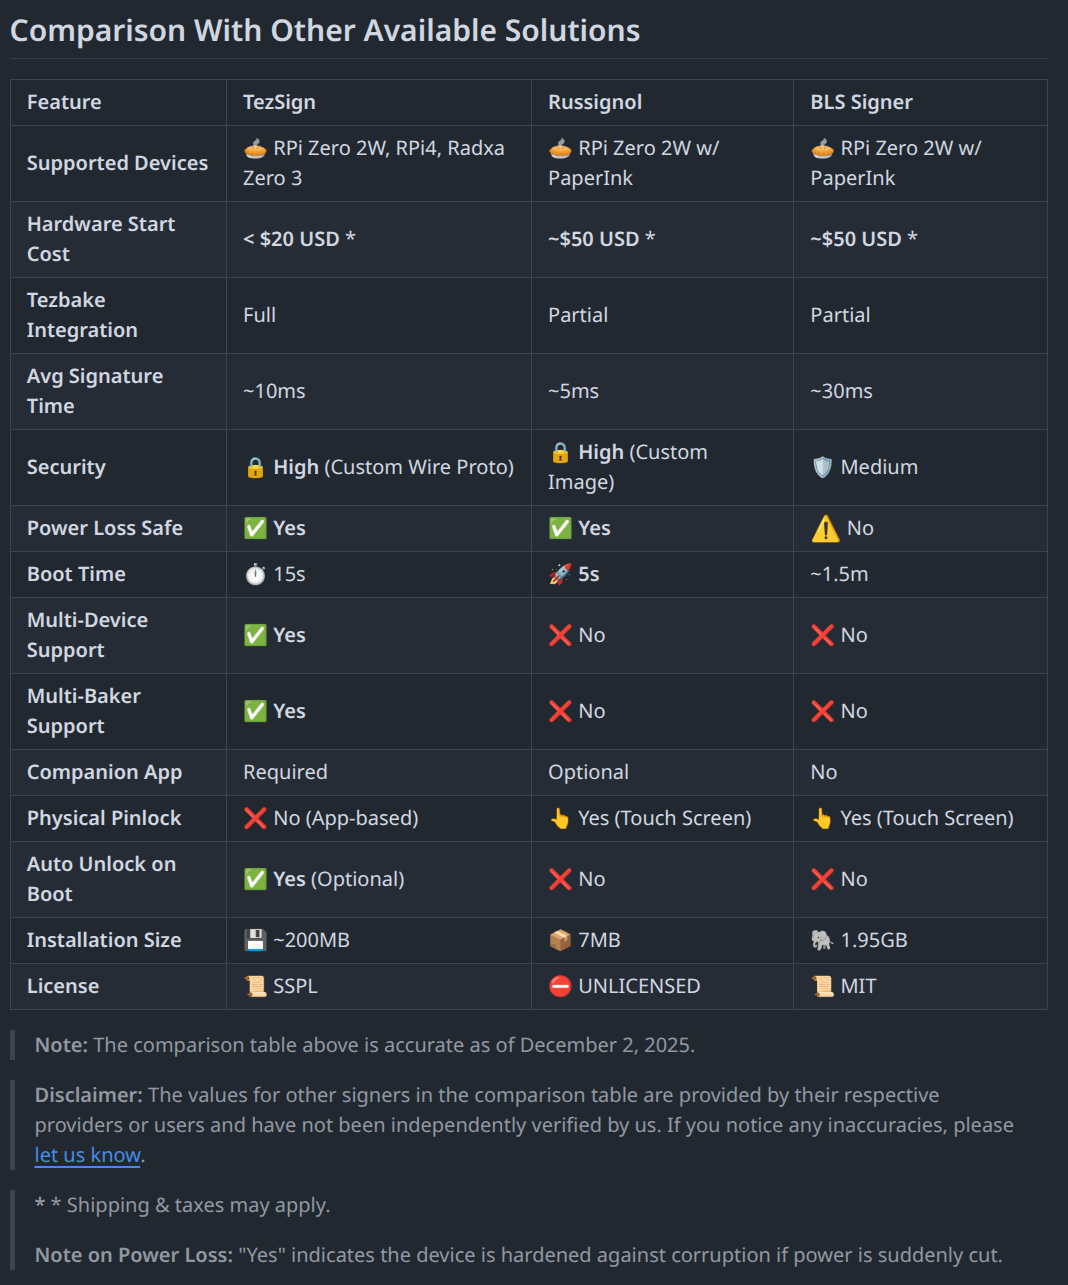
Tezos ecosystem members are also working on alternative signer solutions that complement the RPI BLS Signer, namely TezSign (hardware signer) and Signatory (remote signer with support for HSM/KSM/TEE). We applaud these contributions to the decentralization, diversity, and resilience of Tezos.
Getting started: Step-by-step installation
Assembly instructions
In this video, we go through how to assemble the Tezos RPI BLS signer prototype. We also cover further installation steps, like uploading the software, and launching the device for the first time.
Quick setup (pre-built image)
This tutorial relies on a pre-built image for the Raspberry Pi. If you would rather build everything yourself instead of using the pre-built image you can follow the steps here.
Flash the SD card
- Download the latest tezos-rpi-bls-signer-.img.gz from releases and decompress it.
gzip -d tezos-rpi-bls-signer-<version>.img.gz -v
- Flash to the micro-SD using Raspberry Pi Imager or dd:
sudo dd if=tezos-rpi-bls-signer-<version>.img of=/dev/SD_DEVICE bs=8M \
status=progress conv=fsync
Prepare the host machine (udev rules)
The signer will be plugged into a machine that we refer to as the host in this tutorial. The host can be either a machine running the baker directly (local signer setup) or a machine that your baker connects to (remote signer setup).
- On the host machine, run the udev setup script from the repo:
sudo ./scripts/host/add_udev_rules.sh
sudo udevadm control --reload-rules
sudo udevadm trigger
- This allows your host to recognize and configure the signer automatically.
First start on the device (screen flow)
-
Unplug the SD card from your computer and insert it into the Raspberry Pi.
-
Plug the Pi into your host via the USB data port. Allow a few minutes for the first boot.
-
On the E-ink screen, create a PIN (≥ 4 digits) using the −/+ buttons and ✓ to confirm; re-enter to confirm.
-
The device creates an encrypted key store, generates two tz4 BLS keys, shows the public key hash, then offers “run signer.” Select it to start the signer.
 SSH is enabled by default with user: pi / password: blsigner. On the first connection, we recommend changing the password once connected through ssh with sudo passwd pi. For maximum security, SSH access can also be disabled entirely.
Point your baker at the signer
![]() Until deemed production-ready, we recommend that you only use the RPI BLS Signer with testnet bakers. A baker on the ‘Seoulnet’ test network can be set up using this tutorial.
Until deemed production-ready, we recommend that you only use the RPI BLS Signer with testnet bakers. A baker on the ‘Seoulnet’ test network can be set up using this tutorial.
The steps for pointing your baker to the signer are the following:
-
The signer listens at tcp://10.0.0.1:7732 by default.
-
Discover the remote tz4 keys:
octez-client list known remote keys tcp://10.0.0.1:7732
- Import them into your wallet (replace with the tz4 you saw above):
octez-client import secret key baker_consensus_key \
tcp://10.0.0.1:7732/<tz4_CONSENSUS>
octez-client import secret key baker_companion_key \
tcp://10.0.0.1:7732/<tz4_COMPANION>
- Verify:
octez-client list known addresses
- Set these keys as consensus and companion keys for your delegate:
octez-client --wait none set consensus key for <DELEGATE> to baker_consensus_key
octez-client --wait none set companion key for <DELEGATE> to baker_companion_key
- Restart your baker, explicitly instructing it to use the imported signer keys
octez-baker run with local node <node-data-dir> <delegate> baker_consensus_key \
baker_companion_key
Security considerations
Encrypted key storage
The tz4 BLS keys are stored in an encrypted folder on the device, which is decrypted once the user enters the correct PIN at startup.
We recognize that the current PIN mechanism may not satisfy the security requirements for all bakers. We are working on strengthening the password system and improving key security with features like secure connection and alphanumeric inputs for the PIN/password.
Connection model
The Tezos RPI BLS Signer connects to the host exclusively via USB — no Ethernet or Wi-Fi is used (these will be disabled in the operating system by default in an upcoming release). This USB link simulates a network connection at 10.0.0.1.
As described above, SSH is enabled with default user / password values, which should be changed on the first connection (or disabled entirely).
Operation restrictions
The Octez signer runs with high watermark checks enabled, ensuring that no block or consensus operation can be signed twice at the same level and round. This prevents double baking or double attesting, which could otherwise lead to slashing. Disabling this protection is not recommended.
In addition, the signer is configured to accept only block and consensus operation signing requests. This filtering is enforced through the Octez signer’s magic bytes mechanism. Other operations (e.g. transfer, drain_delegate) are explicitly blocked. Modifying the configuration to allow them is technically possible, but strongly discouraged.
FAQ and beyond
We’ve prepared a dedicated FAQ covering common questions about the Raspberry Pi BLS Signer.
If your question isn’t answered in this blog post or in the FAQ, don’t hesitate to ask directly in the project repository, in this post thread, or in the dedicated channel on Discord.
Your feedback and questions will help us improve the documentation and the tool itself.
Happy signing!